Regions
Regions are a way to assign text prompts and reference images to specific areas in the image.
Introduction
When writing a prompt for an entire image the text instructions can easily become quite complex. It’s possible to describe objects in different parts of the image with phrases like “on the left”, “on the right”, “in the corner” but it’s not intuitive or precise. It’s also common that colors, attributes and concepts get mixed up and muddled.
Observe the following example:
a simple wooden table in a stark empty room, on the left a white porcelain vase with light blue cornflowers, on the right an earthenware bowl, rough shape, painted with muted shades of orange and red
These are the first few outputs from SDXL. Note that colors and descriptions are all over the place. A model with better text understanding (eg. Flux) would do much better for this simple example, but runs into similar issues for longer descriptions with more subjects.
Let’s try with regions:

an earthenware bowl, rough shape, painted with muted shades of orange and reda white porcelain vase with light blue cornflowersa simple wooden table in a stark empty rooma vase with flowers and a bowl on a wooden tableThe prompt is split up between three regions. Specifying “on the left”, “on the right” in the text is no longer needed. Instead there is a “Root” prompt which describes the overall composition of the image without going into details.

Again, these are the first results with the same model and parameters as above. The images aren’t perfect, but subjects are cleanly separated as indicated by the coverage of the region layers.
Composition
Regions are not a tool for composition. This is a frequent misunderstanding. They constrain text prompts to specified areas, but do not enforce subjects to match a certain shape, or even be generated at all!
The following setup with two small regions does not lead to the desired result:

Instead, consider using a compositional tool like sketch, lines or depth Control layers. The following example combines a sketch with regions. Note how the regions need not be particularly precise:

Alternatively build your image from the ground up with Regions in Live mode.
Advantages
As text-to-image models become more powerful their understanding of spatial instructions improves. “Prompt bleeding” becomes less of an issue. But there are many reasons regions remain useful:
- Defining areas is more intuitive and direct. You don’t have to translate canvas areas into prose, you can just point and say there.
- More precise. Translating areas into text and having the model translate them back into spatial information introduces a lot of vagueness.
- Allows for more complex prompts. Even the latest models become less precise the longer the text prompt. Splitting it up helps.
- Improved inpaint workflow. Regions are not only useful for generating the whole image! It is quite common to go back and forth between different selections and refine each individually. With regions you don’t have to swap out text, control layer and reference images each time. You can assign them per area/layer instead.
- Infinite complexity via Region hierarchies.
Basics
This section covers some general advice for using regions.
Creating regions
To create a region, use the button next to the text input.
Regions must be attached to paint layers or layer groups. When creating a new region, it is linked to the active layer by default. If the active layer already has a region, creating a new region will automatically create a new layer.
The area covered by a region is defined by the pixel opacity of the layer it is linked to. Fully transparent pixels are not affected by the region.
Selecting a region’s text input will also make the linked layer active, and the text focus will follow when switching layers. Regions can be removed with the button - this will remove the associated text, but keep the layer. A region can also be linked and unlinked from the active layer.
Root prompt
The text input at the very bottom is reserved for the . It is not linked to any layer. It should describe the general composition of the image with all its subjects. It may also contain instructions about style, medium, quality, etc. which apply to the whole image. The Root prompt is appended to the text of all other regions.
A good way to think about it is that image generation is a global task. To get a good composition, every region generally needs to be aware of the whole image. You may describe a sailing ship in great detail in its own region on one side of the image, and a fearsome Kraken in another, but for a meaningful image to emerge the ship typically needs to be aware that the Kraken exists and vice versa. This is accomplished by describing the scene briefly in the Root prompt.
Coverage and Layer stacking
The area affected by a region follows the stacking logic of paint layers. The portion of the composited image where a certain layer is visible is also what defines the coverage for a region it is linked to.
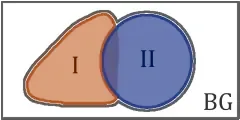
This means layer content is allowed to overlap, layers on top hide parts of layers below. Image generation always produces a single full image which matches the visible areas of the individual layers. Applying a generated result modifies the pixels on all affected layers where they are visible - or creates new layers when using groups.
Background region
It often makes sense to have a region that covers all the parts of the image that aren’t explicitly covered by other regions, and just contains background. Because of the way layer stacking works, this can be achieved by having a fully opaque layer at the bottom of the stack and linking it to a region.
There is nothing special about a background region like that, it works like any other. If there is no need to have a more detailed description of the background, it can be omitted entirely. In that case, parts of the images which are not covered by any region will still follow the Root prompt.
Layer groups
Instead of linking region prompts to paint layers directly, they can also be linked to layer groups. In that case the covered area is the opacity of all group layers composited together. Generated results will be applied as a new layer for every affected region group.
The advantage is that coverage can be continuously adjusted by erasing or adding parts of the layer, eg. to follow the outline of a newly generated result. Transparency masks can be used for more precise control. Generated results remain non-destructive, and can be mixed or partially reverted by erasing.
The disadvantage is that this creates a lot of layers, which require manual merging every now and then to keep things tidy.
Control layers
Each region can have its own set of control layers.
Currently linking control layers to specific regions makes sense for:
Other control layers already have a per-pixel correspondence of their content with the canvas, so regions are less useful. It can still make sense to restrict them to a region if they don’t have content for the entire image, however this is currently only partially supported. It is recommended to keep them attached to the root region.
Workflows
This section describes some common workflows to get started. Once they are set up, regions are flexible and multi-purpose. You can switch between and combine workflows!
Regions from scratch
For 100% strength image generation from a blank canvas, regions can be set up in advance:
- Type a general prompt for the whole image into the text input. This will become the Root prompt.
- Click . This will transform the existing “Background” layer into a region. By default it’s white and fully opaque. Fill in some text that describes things in the background.
- Click again. This creates a new layer group with a single paint layer, and a region linked to the group. Fill in some text that describes your first subject.
- Use a brush to paint the rough area in which you want the first subject to appear. Make sure the area is large enough. This is not the time to be precise. Use any color you like.
- Repeat steps 3. and 4. for other subjects. Keep the total number of regions reasonable (recommended 5 or less).
- Click !
Regions for existing images
This is how to add regions to an existing photo, painting or generated image:
- Type a general prompt for the whole image into the text input. This will become the Root prompt.
- If the entire image is one layer, make sure it is active. Otherwise select your background layer (usually bottom-most). If the background consists of multiple layers, put them in a group and select the group.
- Click . Fill in some text that describes things in the background.
- If your subjects are already on separate layers skip this step. Select a subject from your image (using selection tools). Copy and paste the content. This creates a new layer.
- With the subject layer active, create a new region. Fill in some text that describes the subject.
- Repeat steps 4. and 5. for other subjects.
Live mode
Regions in live mode are fundamentally different than in generation mode. Only the currently active region/layer is generated, along with some padding area around it for context. This is vital:
- It allows to successively paint regions with immediate feedback (before fully setting up all regions).
- Generation remains fast. Regional generation causes a significant slow-down per region otherwise.
- Type a general prompt for the whole image into the text input. This will become the Root prompt.
- Click . This will transform the existing “Background” layer into a region. Fill in some text that describes things in the background and start painting.
- After you have a decent first draft background, it. In live mode this will overwrite existing layer content by default.
- Click . This will create a new paint layer. Fill in some brief text for your first region/subject. Then paint it (as approximately and coarse as you like).
- Apply and move on to the next region.
Live mode is a great way to set up the initial draft and composition. It probably makes sense to move to generation workspace at some point for better quality and upscaling.
Selections
Regions can be used in combination with selections. When using fill or refine the plugin will check which regions are covered by the selection and apply those with sufficient coverage during image generation.
 Visualization of the context area (box), selection mask (pink) and regions intersected within.
Applying a result creates layers for the affected regions only. Keep in mind though that the actual area affected by fill is typically larger than the selection to allow for a smooth transition.
Refine Region
Regions are a great tool to refine individual subjects in the image. It allows you to assign different text prompts and switch between them simply by switching layers. To make this workflow easier there is the toggle. It mainly does two things:
- Uses the active layer coverage as a mask. It’s as if you made a selection for the content of the layer.
- Ignores sibling regions. Only the active region prompt is used (but it is still combined with the Root prompt).
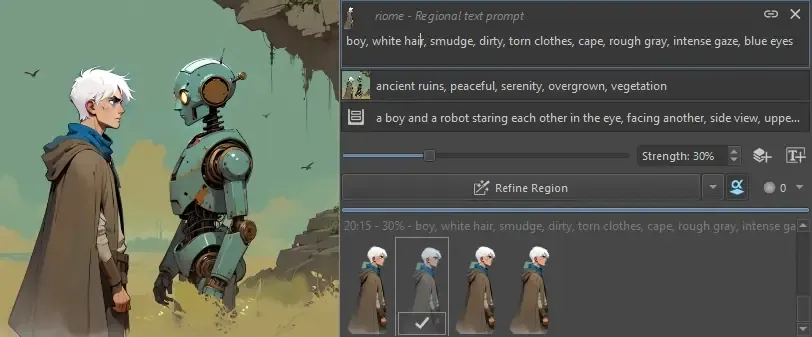 With Refine region, only the left character is generated. Note there is no selection.
Refine region can still be combined with a selection to fill or refine a sub-area of the active layer. It is also a vital part of region hierarchies.
Advanced techniques
Upscaling
Tiled image generation can benefit from regions. Usually text prompts are problematic in this scenario: Because the image is split into multiple tiles which are processed individually, a text prompt needs to apply equally well to all parts of the image. Otherwise the text may negatively impact the result by describing something that isn’t visible in some part of the image, creating a mismatch. Therefore the default for tiled upscale refinement is to not use text prompts.
Regions can solve this issue. Descriptions are already assigned to local areas in the image. Tiled generation will analyse for each individual tile the regions it is affected by. With matching detailed descriptions in place for all parts of the image, generation can be guided for improved results.
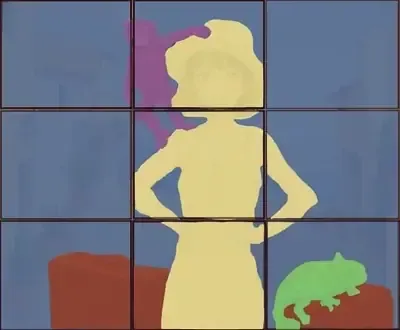
Edit coverage with Transparency masks
The easiest way to adjust the area coverage of a region layer is with the eraser. But this only works for a single layer, and doesn’t allow adding to the area, only removing. Transparency masks can be helpful in those situations. When added to a region group, they allow adding and subtracting from the covered area for the whole group without touching individual layers.
Region hierarchies
Regions can be nested. When work starts on an image, the number of regions should be low and their size relative to the canvas large. That’s because regardless of your canvas resolution, initial generation will use a lower number of pixels and too many regions slow down computation a lot.
As work continues, you might want to split up subjects, or describe parts more precisely. Instead of creating further regions at the top level, you can add sub-regions inside existing regions. This allows to manage complexity better:
- The UI shows text prompt and details for the current parent region and its direct child regions. Other regions remain hidden.
- Generating the whole image will only use top-level regions. Refining a single region will make use of its child regions. The total number of regions for each generation remains manageable.
- Selections can apply the most relevant regions across the whole hierarchy depending on coverage.
